Ingredients
- 1. Crust made of delicate shortcrust pastry
- 2. Chunks of rich 70% dark chocolate, amounting to 6 ½ ounces
- 3. A generous 1 ½ cups of finely ground almonds
- 4. A pair of eggs
- 5. Sweet superfine sugar, measuring ½ cup
- 6. Softened butter, precisely 6 ½ tablespoons
- 7. Trio of pears, meticulously peeled, cored, and quartered
Step 1
To begin, preheat your oven to a toasty 375 degrees F (190 degrees C). Now, take your pastry and roll it out to a delightful 1/4 inch thickness. Gently lay it in a 9-inch tart dish, ensuring a snug fit. Give your pastry some character by pricking it with a fork, then pop it in the freezer for a quick 20-minute chill session to keep it from puffing up too much while baking.
Step 2
Once cooled, bake your pastry in the preheated oven for a short 10 minutes. Set it aside to cool while you lower the oven temperature to a cozy 325 degrees F (165 degrees C).
Step 3
Next, create a makeshift double boiler by simmering water in a saucepan. Once the water is gently bubbling, lower the heat and place a heat-proof bowl on top. Let your chocolate melt slowly in the bowl, resisting the urge to stir too much to maintain its smooth texture.
Step 4
In a separate bowl, mix together ground almonds, eggs, sugar, and butter until well combined. Slowly incorporate the warm melted chocolate into the mixture, stirring gently. Pour this luscious chocolate blend into your pre-baked pastry crust.
Step 5
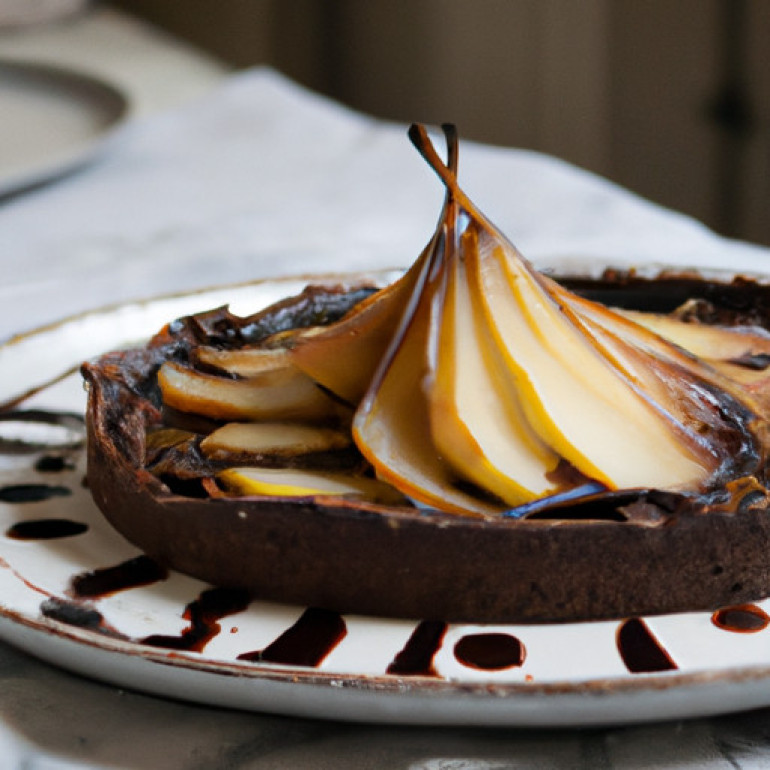
Now, it's time to add a touch of elegance to your tart by artfully arranging sliced pears on top of the chocolate filling.
Step 6
Slide your creation into the warm oven and let it bake until the pastry turns a lovely golden hue and the filling sets, typically around 35 to 45 minutes. Enjoy the delightful aroma wafting from your kitchen as your masterpiece comes to life!
Extra Tips & Suggestions
- 1. Embrace the art of layering: When storing your decadent chocolate pear tart, place a sheet of parchment paper between each slice before stacking them in an airtight container. This will help prevent them from sticking together and maintain their individual flavors.
- 2. Utilize the power of air: For optimal freshness, store your chocolate pear tart in a container with a tight-fitting lid to keep out excess air and humidity. This will help preserve the delicate texture of the tart and prevent it from drying out.


Reviews
Avery
March 20, 2025Oh my goodness, this Decadent Chocolate Pear Tart recipe is a dream come true! The combination of rich chocolate and juicy pears sounds absolutely divine. I can't wait to try making it for our next get-together. Thank
Skyler
March 17, 2025Hey there! This Decadent Chocolate Pear Tart recipe looks absolutely divine!
Elisabetta
March 15, 2025Oh my goodness, this Decadent Chocolate Pear Tart recipe is an absolute must-try! The combination of rich chocolate and sweet pears is a match made in dessert heaven. Trust me, your taste buds will thank you for making this
Alisha
March 11, 2025Wow, this recipe sounds absolutely divine! I can already imagine the rich chocolate and juicy pears coming together in a heavenly way. Can't wait to give it a try - thanks for sharing!
Aria
March 9, 2025Oh my goodness, this Decadent Chocolate Pear Tart recipe is a total game-changer! The rich chocolate combined with the sweet pears is a match made in dessert heaven. Trust me, your taste buds will thank you for making
Cristian
March 8, 2025Oh my goodness, this Decadent Chocolate Pear Tart recipe is an absolute delight! The combination of rich chocolate and sweet pears is simply heavenly. I can't wait to bake this for our next get-together. Thanks for sharing
Avery
March 7, 2025Oh my goodness, this Decadent Chocolate Pear Tart recipe looks absolutely divine! I can already imagine the heavenly combination of rich chocolate and sweet pears melting in my mouth. Can't wait to try it out at our next get-together
David
March 6, 2025Wow, this Decadent Chocolate Pear Tart recipe sounds absolutely divine! I can already imagine the rich chocolate and sweet pears melting in my mouth. Can't wait to give it a try and impress my guests at the next dinner party